BobCGaming (talk | contribs) (added bugs icon) Tag: 2017 source edit |
69Anormal69 (talk | contribs) (→Trivia) Tag: 2017 source edit |
||
| (9 intermediate revisions by 2 users not shown) | |||
| Line 1: | Line 1: | ||
{{RoomsNav}} |
|||
{{Conjecture}} |
{{Conjecture}} |
||
{{About|The Caverns|[[The Sewage Pipes]] or [[The Grand Hallway]]}} |
{{About|The Caverns|[[The Sewage Pipes]] or [[The Grand Hallway]]}} |
||
| Line 9: | Line 9: | ||
BrokenBridgeNew.png|The Caverns |
BrokenBridgeNew.png|The Caverns |
||
</gallery> |
</gallery> |
||
|floors_present=*[[The Mines]] |
|floors_present=* [[The Mines]] |
||
|rooms_present=*142-149 (currently) |
|rooms_present=* 142-149 (currently) |
||
*140-149 ( |
* 140-149 (Before [[The Content Update]]) |
||
|entities= |
|entities= |
||
*[[Seek]] |
* [[Seek]] |
||
*[[Guiding Light]] |
* [[Guiding Light]] |
||
*[[Queen Grumble]] (at the end) |
* [[Queen Grumble]] (at the end) |
||
*[[Jack]] |
* [[Jack]] |
||
*[[Shadow]] |
* [[Shadow]] |
||
*[[Glitch]] |
* [[Glitch]] |
||
*[[Void]] |
* [[Void]] |
||
*[[Eyes]] ( |
* [[Eyes]] (modifiers) |
||
*[[Dread]] |
* [[Dread]] |
||
*[[ |
* [[Rush]] (previous rooms) |
||
*[[ |
* [[Ambush]] (previous rooms) |
||
*[[ |
* [[Screech]] (Trick or Treat modifier) |
||
*[[ |
* [[Timothy]] (Trick or Treat modifier) |
||
*[[ |
* [[Hide]] (Trick or Treat modifier) |
||
*[[ |
* [[Gloombats]] (Trick or Treat modifier) |
||
* [[A-60]] (previous rooms, modifiers) |
|||
*[[The Backdoor#Haste|Haste]] (Modifiers) |
|||
* [[A-90]] (Trick or Treat modifier) |
|||
| ⚫ | |||
* [[A-120]] (previous rooms, modifiers) |
|||
* [[Blitz]] (previous rooms, modifiers) |
|||
* [[Lookman]] (Trick or Treat modifier) |
|||
* [[Figure]] (Chat Control, Admin Panel) |
|||
* [[Haste]] (modifiers) |
|||
* [[RNIUSHCg==]] |
|||
* [[AR0xMBUSH]] |
|||
* [[SCJVEREECH]] |
|||
* [[Jeff the Killer]] (Chat Control, Admin Panel) |
|||
* [[DRAKOBLOXXERS]] (Chat Control) |
|||
| ⚫ | |||
[[File:Ready Or Not.mp3]] |
[[File:Ready Or Not.mp3]] |
||
*'''Door Slam (Mines)''' |
* '''Door Slam (Mines)''' |
||
[[File:MinecartDoorOpen.mp3]] |
[[File:MinecartDoorOpen.mp3]] |
||
*'''Door Knocking''' |
* '''Door Knocking''' |
||
[[File:SeekKnock.mp3]] |
[[File:SeekKnock.mp3]] |
||
*'''Waterfall''' |
* '''Waterfall''' |
||
[[File:Waterfall-Loop.ogg]] |
[[File:Waterfall-Loop.ogg]] |
||
*'''Outside Rain''' |
* '''Outside Rain''' |
||
[[File:RainOutside.wav]] |
[[File:RainOutside.wav]] |
||
*'''Stalactite/Rock Impact 1''' |
* '''Stalactite/Rock Impact 1''' |
||
[[File:SeekImpact1.ogg]] |
[[File:SeekImpact1.ogg]] |
||
*'''Stalactite/Rock Impact 2''' |
* '''Stalactite/Rock Impact 2''' |
||
[[File:SeekImpact2.ogg]] |
[[File:SeekImpact2.ogg]] |
||
*'''Bridge Collapse''' |
* '''Bridge Collapse''' |
||
[[File:BridgeCollapse1.ogg]] |
[[File:BridgeCollapse1.ogg]] |
||
*'''Planks Smash''' |
* '''Planks Smash''' |
||
[[File:MinecartBreak.wav]] |
[[File:MinecartBreak.wav]] |
||
*'''Earthquake (Mines, Seek Chase)''' |
* '''Earthquake (Mines, Seek Chase)''' |
||
[[File:EarthquakeShort.ogg]] |
[[File:EarthquakeShort.ogg]] |
||
*'''Bulb Flicker''' |
* '''Bulb Flicker''' |
||
[[File:BulbFlicker.wav]] |
[[File:BulbFlicker.wav]] |
||
*'''Bulb Break |
* '''Bulb Break''' |
||
[[File:BulbBreak.wav]] |
[[File:BulbBreak.wav]] |
||
*'''Bulb Charge''' |
* '''Bulb Charge''' |
||
[[File:BulbCharge.wav]] |
[[File:BulbCharge.wav]] |
||
*'''Bulb Ambience''' |
* '''Bulb Ambience''' |
||
[[File:BulbLoop.wav]] |
[[File:BulbLoop.wav]] |
||
|containers=* Drawers |
|||
| ⚫ | |||
* |
* Item Lockers |
||
| ⚫ | |||
| ⚫ | |||
|hazards=* [[Floods]] |
|||
* [[Minecart]] |
|||
* [[Seek#Related Hazards|Duck Boards]] |
|||
* [[Seek#Related Hazards|Falling Boulders]] |
|||
* [[Seek#Related Hazards|Dead Ends]] |
|||
* [[Seek#Related Hazards|Broken Bridges]] |
|||
* Stalagmites |
|||
* Stalagmites Pits |
|||
}} |
|||
{{Quote |
|||
|Cart Ride From [[Seek]] (For Free [[Knobs]]) |
|||
| ⚫ | |||
'''The Caverns''' are a major location in [[The Mines]]. Notably, it's where the first [[Seek]] chase takes place. Immediately after, you will be led straight into [[The Nest]] at Door 150. |
'''The Caverns''' are a major location in [[The Mines]]. Notably, it's where the first [[Seek]] chase takes place. Immediately after, you will be led straight into [[The Nest]] at Door 150. |
||
=={{Icons|Overview}} Overview== |
== {{Icons|Overview}} Overview == |
||
[[File:SeekMines.png|thumb|[[Seek]] in The Ravine. |
[[File:SeekMines.png|thumb|[[Seek]] in The Ravine.]] |
||
===The Ravine (Room 142 |
=== The Ravine (Room 142) === |
||
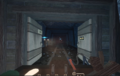
''The Caverns'' begin with a long, flooded room with exposure to the outside, with a pipe overhead. When a [[player]] reaches the end of this room, goo will begin to leak from the pipe and [[Seek]] will rise from the water before giving chase. This room spawns at Door 142. The [[Guiding Light]] takes the form of a trail of blue particles. |
''The Caverns'' begin with a long, flooded room with exposure to the outside, with a pipe overhead. When a [[player]] reaches the end of this room, goo will begin to leak from the pipe and [[Seek]] will rise from the water before giving chase. This room spawns at Door 142. The [[Guiding Light]] takes the form of a trail of blue particles. |
||
===Broken Bridges (Rooms 143-146)=== |
=== Broken Bridges (Rooms 143 - 146) === |
||
The first half of ''The Caverns'' consists of caves, with broken bridges that players have to jump across. Players will have their jump enabled for the first half of the [[Seek]] chase. In Room 146, players will enter a cutscene in which players fails the jump and falls onto a moving [[minecart]], formed by [[Guiding Light]]. |
The first half of ''The Caverns'' consists of caves, with broken bridges that players have to jump across. Players will have their jump enabled for the first half of the [[Seek]] chase. In Room 146, players will enter a cutscene in which players fails the jump and falls onto a moving [[minecart]], formed by [[Guiding Light]]. |
||
=== Minecart |
=== Minecart Section (Rooms 147 - 148) === |
||
The corresponding half is a [[minecart]] rail, where players have to duck to avoid obstacles and steer between different tracks. There will be tracks splitting into 2 or 3 paths, with the [[Guiding Light]] showing the correct path. If players select the wrong track or do not select a track in time, the [[minecart]] will follow the incorrect track and crash into a wall or fall into a pit, resulting in their death. A player will take 40 damage and temporarily have their vision blurred if they fail to duck under the obstacles in time. |
The corresponding half is a [[minecart]] rail, where players have to duck to avoid obstacles and steer between different tracks. There will be tracks splitting into 2 or 3 paths, with the [[Guiding Light]] showing the correct path. If players select the wrong track or do not select a track in time, the [[minecart]] will follow the incorrect track and crash into a wall or fall into a pit, resulting in their death. A player will take 40 damage and temporarily have their vision blurred if they fail to duck under the obstacles in time. |
||
===Room 149=== |
=== Room 149 (Nest Entrance) === |
||
The final room consists of a platform with lockers each side, and a gate and buffer stop that prevents the [[minecart]] from moving, therefore ending the [[Seek]] chase. The [[minecart]] then starts moving again and continues on the rail, until a cutscene plays in which [[ |
The final room consists of a platform with lockers each side, and a gate and buffer stop that prevents the [[minecart]] from moving, therefore ending the [[Seek]] chase. The [[minecart]] then starts moving again and continues on the rail, until a cutscene plays in which [[Queen Grumble]] appears and player/s fall/s into [[The Nest]]. |
||
''The Caverns'' last for 7 Doors, starting from Door 142 and ending at Door 149. |
''The Caverns'' last for 7 Doors, starting from Door 142 and ending at Door 149. |
||
===Hazards=== |
=== Hazards === |
||
| ⚫ | * Stalagmites: Stalagmites are located in the middle of Broken Bridges, specifically, in the Broken Bridges section, if the player jumps too early towards a broken bridge, the player will fall into the spikes and die with their torso being brutally impaled by them. Stalagmites can also be found in pits at the end of some of the wrong ways in the minecart chase. |
||
| ⚫ | * Falling Boulders: Boulders appear in the Broken Bridges section, they usually fall out of the ceiling and towards the path of the correct bridge. This can potentially block the players way and causes [[Seek]] to be able to slightly catch up, however, they don't deal any damage and they can't directly kill the player. |
||
| ⚫ | * Wooden Barriers: Wooden Barriers appear in the Minecart Rail section, it appears to be a obstacle where players must crouch in order to get past, it will usually appear on the correct path of split paths and sometimes on the incorrect path or even may appear right before divided paths which might cause the player to just crouch instead of steering the minecart, causing the player to automatically go to the wrong path, this does not apply to the inside variant as it's always guaranteed on the right path and not in front of the path. If they are not dodged, the player will take 40 damage and temporarily have blurred vision. |
||
| ⚫ | |||
| ⚫ | |||
| ⚫ | |||
| ⚫ | *Stalagmites: Stalagmites are located in the middle of Broken Bridges, specifically, in the Broken Bridges section, if the player jumps too early towards a broken bridge, the player will fall into the spikes and die with their torso being brutally impaled by them. Stalagmites can also be found in pits at the end of some of the wrong ways in the minecart chase. |
||
| ⚫ | |||
| ⚫ | *Boulders: Boulders appear in the Broken Bridges section, they usually fall out of the ceiling and towards the path of the correct bridge. This can potentially block the players way and causes [[Seek]] to be able to slightly catch up, however, they don't deal any damage and they can't directly kill the player. |
||
| ⚫ | *Wooden Barriers: Wooden Barriers appear in the Minecart Rail section, it appears to be a obstacle where players must crouch in order to get past, it will usually appear on the correct path of split paths and sometimes on the incorrect path or even may appear right before divided paths which might cause the player to just crouch instead of steering the minecart, causing the player to automatically go to the wrong path, this does not apply to the inside variant as it's always guaranteed on the right path and not in front of the path. If they are not dodged, the player will take 40 damage and temporarily have blurred vision. |
||
| ⚫ | |||
| ⚫ | |||
* |
|||
* |
|||
* |
|||
| ⚫ | |||
| ⚫ | |||
* Whilst in a minecart, you cannot use, or even select any [[items]], such as a [[Crucifix]], to save you. This makes Doors 146-148 extremely difficult due to the speed of the minecart and the little time you have to pick the right path, illuminated by [[Guiding Light]]. |
* Whilst in a minecart, you cannot use, or even select any [[items]], such as a [[Crucifix]], to save you. This makes Doors 146-148 extremely difficult due to the speed of the minecart and the little time you have to pick the right path, illuminated by [[Guiding Light]]. |
||
==Tips == |
== Tips == |
||
| ⚫ | |||
| ⚫ | |||
| ⚫ | |||
| ⚫ | |||
| ⚫ | |||
| ⚫ | |||
| ⚫ | |||
| ⚫ | |||
== {{Icons|Bugs}} Bugs == |
== {{Icons|Bugs}} Bugs == |
||
| ⚫ | |||
| ⚫ | |||
** The [[Queen Grumble]] pursuing a player will not kill them, and will instead disappear. This means that players are softlocked.<ref>https://www.youtube.com/watch?v=xgwzKn-Cq3A</ref> |
** The [[Queen Grumble]] pursuing a player will not kill them, and will instead disappear. This means that players are softlocked.<ref>https://www.youtube.com/watch?v=xgwzKn-Cq3A</ref> |
||
* |
* Before [[The Content Update]], there was a small chance that [[Guiding Light]] would disappear throughout the minecart chase, making it impossible to tell which way to go.<ref>https://www.youtube.com/shorts/CgB0lMoXPVY</ref> |
||
*Spectating players can't see the minecart that an alive player is riding in. |
* Spectating players can't see the minecart that an alive player is riding in. |
||
*If you stop right before the jump in |
* If you stop right before the jump in Door 146, [[Seek]] will run into the floor and will not kill you, however if you activate the cutscene afterwards, you will die at the end of it. If Seek reaches Door 147 you will also die instantly. |
||
=={{Icons|Trivia}} Trivia== |
== {{Icons|Trivia}} Trivia == |
||
| ⚫ | |||
| ⚫ | |||
| ⚫ | |||
* Each room has an actual name in the game files, also shown in the [[Admin Panel]]. |
|||
** The Ravine (142) is named "Mines_SeekStart". |
|||
** Room 143 is named "Mines_SeekJumpTutorial". |
|||
** Rooms 144 and 145 are named "Mines_SeekGeneral". |
|||
** Room 146 is named "Mines_SeekMinecartTransition". |
|||
** Rooms 147 and 148 are named "Mines_SeekMinecart1". |
|||
** The Nest Entrance (149) is named "Mines_SeekToGrumble". |
|||
== {{Icons|Gallery}} Gallery == |
|||
| ⚫ | |||
| ⚫ | |||
| ⚫ | |||
== Gallery== |
|||
<tabber> |
<tabber> |
||
|-| |
|-| |
||
In-game= |
|||
<gallery> |
<gallery> |
||
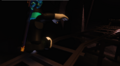
Caverns SeekAngle.png|[[Seek]] chasing a player through ''The Caverns''. |
Caverns SeekAngle.png|[[Seek]] chasing a player through ''The Caverns''. |
||
| Line 124: | Line 148: | ||
Screenshot 20241113-051928 YouTube.png|What appears to be a scrapped version of The Minecart Rails seen in the trailer. |
Screenshot 20241113-051928 YouTube.png|What appears to be a scrapped version of The Minecart Rails seen in the trailer. |
||
</gallery> |
</gallery> |
||
|-| |
|-| |
||
Locations= |
|||
<gallery> |
<gallery> |
||
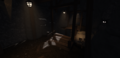
BrokenBridgeNew.png|A Broken Bridge Room with Stalagmites on the bottom. |
BrokenBridgeNew.png|A Broken Bridge Room with Stalagmites on the bottom. |
||
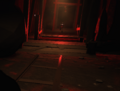
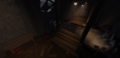
Caverns145.png|Door 146, the introduction to the [[minecart]] sequence. |
Caverns145.png|Door 146, the introduction to the [[minecart]] sequence. |
||
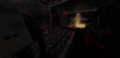
CavernsMinecartRail1.png| |
CavernsMinecartRail1.png|Inside Cave Minecart Rail. |
||
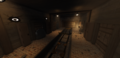
CavernsMinecartRail2PickaPath.png| |
CavernsMinecartRail2PickaPath.png|Inside Cave 2 Path Minecart Rail. |
||
MinecartRailNew.png|Big Cave 3 Path Minecart Rail. |
MinecartRailNew.png|Big Cave 3 Path Minecart Rail. |
||
CavernsEnd.png|The end of the ''Caverns'' [[Seek]] chase. |
CavernsEnd.png|The end of the ''Caverns'' [[Seek]] chase. |
||
| Line 136: | Line 161: | ||
</tabber> |
</tabber> |
||
=={{Icons|Gallery}}References== |
== {{Icons|Gallery}} References == |
||
{{Reflist}} |
|||
<references /> |
|||
{{Navigation}} |
{{Navigation}} |
||
[[Category:Locations]] |
[[Category:Locations]] |
||
[[Category:Locations (The Mines)]] |
[[Category:Locations (The Mines)]] |
||
Latest revision as of 19:35, 29 June 2025
<infobox layout="stacked"> <title source="title"><default>The Caverns</default><format>The Caverns</format></title>
<image source="image"></image> <label>Floors Present</label> <label>Rooms Present</label> <label>Containers</label> <label>Entities</label> <label>Hazards</label> <label>Sound Files</label> </infobox>
The Caverns are a major location in The Mines. Notably, it's where the first Seek chase takes place. Immediately after, you will be led straight into The Nest at Door 150.
 Overview[edit | edit source]
The Ravine (Room 142)[edit | edit source]
The Caverns begin with a long, flooded room with exposure to the outside, with a pipe overhead. When a player reaches the end of this room, goo will begin to leak from the pipe and Seek will rise from the water before giving chase. This room spawns at Door 142. The Guiding Light takes the form of a trail of blue particles.
Broken Bridges (Rooms 143 - 146)[edit | edit source]
The first half of The Caverns consists of caves, with broken bridges that players have to jump across. Players will have their jump enabled for the first half of the Seek chase. In Room 146, players will enter a cutscene in which players fails the jump and falls onto a moving minecart, formed by Guiding Light.
Minecart Section (Rooms 147 - 148)[edit | edit source]
The corresponding half is a minecart rail, where players have to duck to avoid obstacles and steer between different tracks. There will be tracks splitting into 2 or 3 paths, with the Guiding Light showing the correct path. If players select the wrong track or do not select a track in time, the minecart will follow the incorrect track and crash into a wall or fall into a pit, resulting in their death. A player will take 40 damage and temporarily have their vision blurred if they fail to duck under the obstacles in time.
Room 149 (Nest Entrance)[edit | edit source]
The final room consists of a platform with lockers each side, and a gate and buffer stop that prevents the minecart from moving, therefore ending the Seek chase. The minecart then starts moving again and continues on the rail, until a cutscene plays in which Queen Grumble appears and player/s fall/s into The Nest.
The Caverns last for 7 Doors, starting from Door 142 and ending at Door 149.
Hazards[edit | edit source]
- Stalagmites: Stalagmites are located in the middle of Broken Bridges, specifically, in the Broken Bridges section, if the player jumps too early towards a broken bridge, the player will fall into the spikes and die with their torso being brutally impaled by them. Stalagmites can also be found in pits at the end of some of the wrong ways in the minecart chase.
- Falling Boulders: Boulders appear in the Broken Bridges section, they usually fall out of the ceiling and towards the path of the correct bridge. This can potentially block the players way and causes Seek to be able to slightly catch up, however, they don't deal any damage and they can't directly kill the player.
- Wooden Barriers: Wooden Barriers appear in the Minecart Rail section, it appears to be a obstacle where players must crouch in order to get past, it will usually appear on the correct path of split paths and sometimes on the incorrect path or even may appear right before divided paths which might cause the player to just crouch instead of steering the minecart, causing the player to automatically go to the wrong path, this does not apply to the inside variant as it's always guaranteed on the right path and not in front of the path. If they are not dodged, the player will take 40 damage and temporarily have blurred vision.
- Cave-ins: Cave-ins can be found at the wrong way in The Inside Cave variant in The Minecart Rails. They instantly kill the player
- Stalagmite Pits: These are the Minecart Rail Cave variant of the cave-ins , they appear to be a pit with spikes. If a player takes the wrong path, the minecart will stop on a buffer stop, the player will get flinged out of the minecart and fall to the pit, causing them to get killed.
Notes[edit | edit source]
- It's important to know that while holding A/D to steer, it slows down a player's minecart which might result in Seek catching up.
- Whilst in a minecart, you cannot use, or even select any items, such as a Crucifix, to save you. This makes Doors 146-148 extremely difficult due to the speed of the minecart and the little time you have to pick the right path, illuminated by Guiding Light.
Tips[edit | edit source]
- Look ahead to give yourself as much time to react as possible, especially during the minecart section.
- Holding A/D can make your minecart slower to make it easier to react. However, this also means that Seek might be able to catch up.
- When the minecart is going down a ramp, look up to have more time to react.
- The same can be done for turns, instead looking in the direction the minecart is turning.
 Bugs[edit | edit source]
- If a player uses a Revive (when no other players are alive) as soon as the Seek chase is over, the minecart might stop moving right as it enters The Nest.
- The Queen Grumble pursuing a player will not kill them, and will instead disappear. This means that players are softlocked.[1]
- Before The Content Update, there was a small chance that Guiding Light would disappear throughout the minecart chase, making it impossible to tell which way to go.[2]
- Spectating players can't see the minecart that an alive player is riding in.
- If you stop right before the jump in Door 146, Seek will run into the floor and will not kill you, however if you activate the cutscene afterwards, you will die at the end of it. If Seek reaches Door 147 you will also die instantly.
 Trivia[edit | edit source]
- The Seek chase in The Caverns is proceeded by the second Seek chase, which occurs in The Sewage Pipes.
- Items can spawn on drawers/inside lockers and on tables during the chase, including during the minecart section and Door 149.
- According to most players, this is the hardest Seek chase out of the two that occur in The Mines.
- Each room has an actual name in the game files, also shown in the Admin Panel.
- The Ravine (142) is named "Mines_SeekStart".
- Room 143 is named "Mines_SeekJumpTutorial".
- Rooms 144 and 145 are named "Mines_SeekGeneral".
- Room 146 is named "Mines_SeekMinecartTransition".
- Rooms 147 and 148 are named "Mines_SeekMinecart1".
- The Nest Entrance (149) is named "Mines_SeekToGrumble".
 Gallery[edit | edit source]
<tabber> |-| In-game=
Seek chasing a player through The Caverns.
A visual bug where dead players do not see the minecart of the alive player(s).
The Backdoor timer appearing in the minecart section due to having the 'Uh Oh', 'How Unfortunate' or 'Chaos, Chaos' modifier activated.
Ditto, but with the doors opened.
- Screenshot 20241113-051928 YouTube.png
What appears to be a scrapped version of The Minecart Rails seen in the trailer.


|-| Locations=
A Broken Bridge Room with Stalagmites on the bottom.
Door 146, the introduction to the minecart sequence.
Inside Cave Minecart Rail.

Inside Cave 2 Path Minecart Rail.
- MinecartRailNew.png
Big Cave 3 Path Minecart Rail.
The end of the Caverns Seek chase.
The entrance to The Nest.


</tabber>
References[edit | edit source]
{{#vardefine:columns|1}}