<infobox layout="stacked"> <title source="title"><default>Solution Paper</default><format>{{{title}}}</format></title>
<image source="image"></image> <group layout="vertical" show="completed"> <header>INFORMATION</header> <label>Status</label> <label>Type</label> <label>Fuel Time</label> <label>Maximum Stack</label> <label>Shop Description</label> <label>Shop Price</label> <label>Usage</label> <label>Damage</label> <label>Size</label> </group> <group layout="vertical" show="completed" collapse="closed"> <header>SOUND FILES</header> </group> </infobox>
"Once the door is open, you must run out of the room!"
- Guiding Light when Door 51 is open
The Solution Paper is a puzzle item that can only be found in The Library at Room 50.
 Overview[edit | edit source]
The Solution Paper appears to be a piece of paper from a binder with several drawings inscribed on it. It spawns on top of the Large Office Desk in The Library.
When a player walks into Room 50, the game will generate five random shapes out of eight possible options to display on the page with a matching Roman numeral located above, ranging from I to V. A picture of the lock is shown below the shapes, and a blue rectangle on the right depicts five combination lock tumblers. These are numbered accordingly in Roman numerals (I, II, III, IV and V).
In the Super Hard Mode, the roman numeral count increased to 11, and it takes about 4 seconds to pick up the paper, making it more difficult than normal gameplay.
 Usage[edit | edit source]
The Solution Paper must be collected from its spot on top of the Large Office Desk in order to be used. It shows that the player will need to collect Library Books until they have located the five symbols that are shown on the Solution Paper. Afterwards, the player must collect library books and approach the lock on Door 51. The Solution Paper will display the order of numbers that should be entered.
For example, the default Solution Paper's item image shows five shapes (11 in Super Hard Mode) which are Pentagon, Hexagon, Star, Square and Circle. The player would need to put the numbers that correspond to these shapes into each of the lock tumblers. For example, if the numbers for the passcode were the following: Pentagon is 5, Hexagon is 2, Star is 1, Square is 0, and Circle is 3. Once deciphered, the player would input the passcode 52103 into the lock tumblers.
Notes[edit | edit source]
- The eight shapes in alphabetical order are Circle, Cross (otherwise known as X due to it being tilted), Diamond, Hexagon, Pentagon, Square, Star, Triangle.
- The numbers that are generated within the books can only be single-digit numbers, ranging from 0 to 9.
- A player messaging in the in-game chat the order of numbers is recommended, because it can help the player remember the order. In multiplayer, this can also be used to help teammates to communicate the numbers between one another.
- The Solution Paper always shows that the Pentagon's number is 4, however this is purely for demonstration to show where the numbers are located in the Library Books.
- In SUPER HARD MODE, it is way more difficult to solve the puzzle, as the Solution Paper has its roman numerals scrambled, with an extra 11th digit that isn't needed.
 Trivia[edit | edit source]
- The Solution Paper will disappear from the player's inventory once the library exit is opened.
- When a player is holding the Solution Paper, it is possible for other players to see what is written on it.
- If a player's character is short enough, the Solution Paper will be held way over their head.
- There is an extremely rare chance that the numbers each Solution Paper gives is the same exact number every time. This was first seen in one of KreekCraft's DOORS live-streams.
 Gallery[edit | edit source]
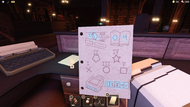
The Solution Paper in a player's hand.
- Solutionpaperondesk.jpg
A Solution Paper on the Large Office Desk.
The Library, the location where you find the Solution Paper.
- Solution paper on table (texture).png
The texture of the Solution Paper on the Large Office Desk.

Texture in the upper part of the Solution Paper.

Texture in the botom part of the Solution Paper.

Texture with all the shapes.
- Error creating thumbnail: File missing
A texture for an unimplemented solution paper/manual for The Electrical Room's circuit breaker switches.


