<infobox layout="stacked"> <title source="title"><default>The Nest</default><format>The Nest</format></title>
<image source="image"></image> <label>Floors Present</label> <label>Rooms Present</label> <label>Containers</label> <label>Entities</label> <label>Hazards</label> <label>Sound Files</label> </infobox>
Sorry, sorry!
- Trespassing Achievement description
The Nest is a boss location in The Mines that appears at Door 150. It is where multiple Grumbles reside, which are the main obstacle of the room.
 Overview[edit | edit source]
The Nest is a cave system patrolled by a total of 5 Grumbles, which includes the Queen Grumble. It is also filled with smaller rooms and spaces to hide from them. There are 4-6 anchors scattered across The Nest, depending on the player count.
 Walkthrough[edit | edit source]
After completing the first Seek chase, the players continue on their minecarts into a dark area. Eventually, the Queen Grumble descends onto the track in front of them, with the players' minecarts automatically tilting to the right to avoid it. After bursting through Door 150 and falling into The Nest, players continue running into the terminal area. Shortly after, a gate closes, preventing the Queen Grumble from entering.
Players have to press the red button on the generator in order to power it up and begin the code puzzles. It takes roughly 5 seconds to fully power it up.
The screen on the terminal will tell the player to locate an Anchor (a terminal with a keypad), identified by a letter, and enter a code. The letter and code are stored in the lower left corner of players' screens. The players' objective is to find the Anchor with the same letter and enter the code. The antenna on the main terminal will point towards its location. The number of anchors depends on the number of players alive when entering The Nest. For 1 player, there are 4 Anchors, for 2 players, there are 5 Anchors, and for 3 or more players, there are 6 Anchors. Anchors are able to spawn in multiple spawn locations throughout the map among three different levels.
Every few seconds, in response to a signal from the generator's antenna, the required Anchor emits an audible beep, a flash of green light from its antenna, and a blue pulse visible through walls. The closer the player is to the Anchor, the louder the beep, and the closer the generator is to the Anchor, the shorter the delay between their beeps. Players will have to avoid the patrolling Grumbles during their search for the anchor. Once the code has been entered, the player pulls the lever, and if the correct code was entered, the Anchor is powered. After that, the generator will automatically begin communicating with the next anchor, and its letter and code appear on the player's screen. Typically, each successive Anchor is further away from the main terminal.
Every Anchor after the first will contain a sticky note with a "plus" or "minus" sign and a number on it. That note dictates the amount the digits have been "shifted" by. Examples:
- If the Anchor gives the code "439" and the note says "-2," subtract 2 from each digit: 4 − 2 = 2; 3 − 2 = 1; 9 − 2 = 7, which means that the player types in "217". The screen on the anchor, however, will show the original numbers, in this case: "439".
- If a digit goes beyond 0, subtract it back from 9: code "109" and a "-2" sticky note = enter "987."
- Same goes for addition: code "703" and a "+5" sticky note = enter "258".
The last Anchor will have a broken screen, so you will need to keep the numbers in mind along with the appropriate math.
After all Anchors have been powered, the players must travel back to the terminal and press the red button again to power the bridge. This will teleport all players back to the terminal, and a cutscene plays where the bridge leading out of The Nest begins to lower and the gate leading into the room the players are in closing, only for the Queen Grumble to bang on and eventually burst through it. This leads to a short chase sequence where the players escape The Nest via the bridge, eventually running through Door 151, where the Guiding Light seals the door.
 Map[edit | edit source]
 Entities
 Bugs[edit | edit source]
- According to LSPLASH in the Discord server, the cutscene for The Nest would not work.[1][2]
- Anchor B will sometimes not make any sound and not emit Guiding Light aura.
- This sometimes extends to all other anchors, making The Nest more difficult.
- Sometimes the radar doesn't load, not showing the player where the anchor is located.
- If a player is climbing a ladder when a different player presses the final button at the terminal, the player will be teleported back to their original location after climbing down the ladder at Door 151 until voided.[3]
- If the player was to stay on a ladder after being teleported back to The Nest, once voided, the player has a high chance of being teleported above the map.[4]
- If a player looks above the rocks on the left of the main room with the transmitter, and uses the Terminal Velocity candy, they can skip The Nest and not award the badge.
- It is also possible the player falls down The Nest and drowns.
- Currently, there is a bug where Screech can attack during the Queen Grumble chase cutscene.
- This may be problematic especially with the 'Last Few Breaths'/'Last Breath' modifier on.
- From the looks of it, Screech can only spawn during the few seconds after Door 150 is opened before the cutscene starts. To counter this, search for Screech about 1.5s before the cutscene starts to get rid of it.
- When entering Door 150, the minecart will sometimes suddenly pause before proceeding through the deranged railway.
- But in the first days of The Mines update, if this happened, you were softlocked.
- After The Content Update, Grumbles can no longer be blinded by a Flashlight or a Spotlight.
 Trivia[edit | edit source]
- When you press the button to activate the next Anchor, the radar on the terminal will point towards the next anchor.
- There are always 5 Grumbles patrolling, one of them being the Queen Grumble.
- This does not apply if one of the 4 Grumbles has been banished by a Crucifix. Note that the Queen Grumble cannot be permanently banished.
- One of the Anchor B locations to the right of the bridge has a one-way shortcut from the anchor area back to the terminal.
- Some sub-rooms have a big hole in the wall, this allows a Grumble to go in. If they enter, players have to either escape or get deeper inside the room.
- The number of anchors depends on the amount of current living players (dead players won't count). In single-player mode, there are 4 anchors in the Nest (Anchors A-D). 5 anchors (Anchors A-E) for 2 players, and 6 anchors (Anchors A-F) for 3+ players.
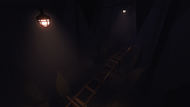
- The room contains 2 ladders to a higher sub-room.
- All players will be teleported to the bridge once all anchor codes are solved and the button is pressed.
- When too close to a Grumble, it will attempt to attack the player dealing 50 damage. Going inside a locker when close to a Grumble will protect you, however it is not recommended as the Grumble may stay outside the locker and Hide will kick you out.
- While playing, dead Screeches will slowly pile up in certain areas of the room, implying that they and Grumbles are related.
- Anchor A will always spawn next to the console as a demonstration, with no randomized location.
- Anchor B, C and D have multiple spawn areas for that anchor specifically.
- Anchor E and F can only spawn in the same locations as Anchor D.
- There are only 3 possible D spawns, meaning if there are 6 anchors (A-F), every D spawn will be taken.
- Grumbles will roam around The Nest. The moment you hear one of them laugh, find a place to hide, as that means they have spotted you.
- The Queen Grumble during the beginning and end of The Nest can insta-kill you by either catching up to you, or if you get trapped behind the first gate, leaving you stuck with it.
- Grumbles rely solely on sight and memory, so the Alarm Clock is no use.
- Queen Grumble makes no laughing sounds, making it difficult to know when it is chasing the player. Additionally, it is faster than other Grumbles.
- There is a room with a hole in the wall containing an Anchor B spawn. The corners of this room away from the hole are safe, but Grumbles can partially enter the room and hit you if you are too close.
- The Nest was widely considered to be the hardest room in The Mines, being notably harder than The Dam.
- However, The Nest was nerfed in The Content Update and as such this is no longer the case.
- Grumbles and their nest work much like an ant colony - or any complex organisms' colony - both protecting their Queen from any danger. However, in this case, the Queen Grumble also actively searches the nest for food unlike queen ants.
- The Nest functions similarly to the DJ Music Man boss fight from Five Nights at Freddy's: Security Breach, in that players run around looking for switches, and then the music changes after one is found.
- Music that plays in the Nest sounds somewhat similar to Alone in the Dark OST - Alone in the Dark.
- There are many piles of presumably dead Screeches scattered around, possibly playing an important part in the lore.
- It was previously possible to climb the rock easily by crouching and go up to an Anchor B location easily. After the 9/18/2024 patch, invisible walls were added, making it impossible to get over the rocks.
- Screech will not despawn upon interacting with an anchor, but it is unable to spawn while entering the code.
- Prior to the Content Update, it was possible to enter the code for an anchor even before the instructions for that anchor have been given. However, this would be quite tedious, as the player would have to 1) search all of the 3 or 4 anchor locations for that type of anchor and 2) brute force the 3-digit code by testing all 1000 different permutations.
 Tips[edit | edit source]
- It is preferable to bring a light source, preferably a Spotlight, to see down tunnels and check for/slow Grumbles.
- Over time, the layout of the Nest will become more familiar. Anchor spawns are mostly randomized, but each spot can be memorized relatively easily.
- Above all, be patient. Compared to Figure, Grumbles can detect the player easily (by sight), take up the entire width of a corridor, and may turn around at any time. Therefore, one can get away with certain risks when dealing with Figure that will get the player killed when dealing with Grumbles.
- This is especially true if Anchor C is one of the two on the right side. This area, along with the pair of tunnels leading there, is known to some players as Coffin Corner due to the difficulty in returning from either location.
- If a player finds Anchor C in Coffin Corner (occurring 50% of the time), it is advised to wait just outside the room with the hole in the wall until there is only one Grumble in the loop of tunnels leading to the Anchor. When returning, run back to the broken wall after scanning both tunnels with a Spotlight. It is also advisable to light one tunnel with a glowstick. Any shadow can mark a Grumbles appearance.
- You may find that sometimes the one Grumble left refuses to leave. In this case, wait until you see it head towards you down one path of the loop, then run down the other to the B2 room. You have enough of a head start to outrun it.
- It is not recommended for players to slow down Grumbles chasing them from behind with their light source, as the player is slowed while walking backwards. Instead, run facing forward. It is advisable to slow grumbles down if they are in front and there is a safe spot nearby.
- One of the best ways to identify the location of Grumbles is by their sound, so it is best to go through tunnels when they are quiet.
- Players should stock up on glowsticks as much as possible leading up to The Nest. Glowsticks as markers for where to go and how to get back.
- Be careful going over vertical tunnels, as the Grumbles use those to change levels, which may result them landing on top of the player which is most of the time fatal.
- A common trick is to bait a Grumble into a hallway with a sub-room and go through the sub-room. The Grumble will usually go all the way through the sub-room, leaving space to run behind the Grumble and escape it.
- Following Grumbles from behind is a bad idea, as they have a tendency to do a 180 turn at any moment. However, it is possible to go unscathed if you are careful enough but be warned that another Grumble can come up behind you at any moment.
- If there are other players alive, have one player stay at the terminal while you search for the last anchor. Once the anchor has been activated, have the terminal player activate the terminal to skip having to navigate back.
- It is recommended to save at least 1 use of Shears to create a shortcut in case an anchor is located in the garden sub-room.
- Extra anchors can still stay even after a player dies, effectively making The Nest harder (e.g., if two players reach The Nest, there will be 5 anchors, but if one player dies without completing any anchors, the remaining player will still have to do 5 anchors).
- It is recommended to lower the in-game music volume when in door 150, to make hearing the Grumbles easier. It is best to turn it down entirely when locating anchors D+.
- One of the easiest anchor locations are - Anchor B on the right side, Anchor C on the 2nd floor and the Anchor D in the garden room (with shears) or in the room after walking straight from the waterfall.
- The Anchor D on the left side was constantly camped by one Grumble, sometimes two. However, this was nerfed significantly in The Content Update. Both ends of the donut tunnel near the anchor now have safe spots (since The Content Update). However, this is still the hardest Anchor D spawn.
- There is a tunnel to the north of the generator (nicknamed the "Death Tunnel" or "Death-wish Passage") that is very dangerous to enter as it is a notoriously long passage towards two B anchor spawns. It is much better to use one of the side-routes next to it to get to an Anchor, which have multiple hiding places and safe spots.
- In case the Queen Grumble sees you (identifiable by its trademark scar), try to quickly locate a sub-room to hide in or a or a locker, due to it being faster than the other Grumbles.
- If playing with the Trick or Treat modifier, try to obtain at least one Guidance Candy to temporarily see where all of the Grumbles and Anchor Points are.
- It is recommended to use it when Anchor C is in Coffin Corner (both ways), or Anchor D is positioned far away from a safe spot.
- The Nest can be skipped entirely if a player eats a Terminal Velocity Candy while positioned and looking in the right spot.
- If the player misses, they will be forced to drown in the water below due to them not being able to swim.
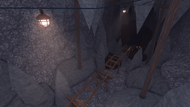
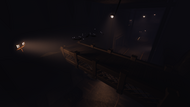
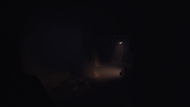
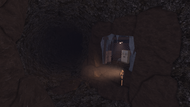
Gallery[edit | edit source]
<tabber> |-| Screenshots =
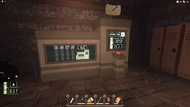
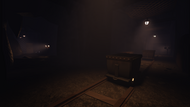
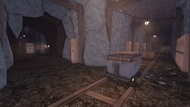
The Console.
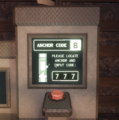
Ditto, but displaying the code for Anchor B.
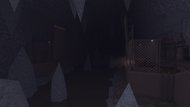
One of the Grumbles.
- Error creating thumbnail: File missing
A Grumble inside one of the B anchor rooms.
- QueenGrumble2.png
The Queen Grumble moving around.
- TheNestAfterDread.png
The Nest darkened after Dread appeared.
- Louie-Nest.png
A Louie hole in main console room.


|-|Assets=
- TheMines ConsoleVectorGraphics.png
The Vector Graphics displayed on the Console.
- TheMines ConsoleStationVectorGraphics.png
Ditto but Station.
|-|Images=
Entrance
Ditto
Gates

Ditto
- Starting point.png
Starting Point
Caverns (First Floor)
Ditto
Caverns (Second Floor)
Ditto
- Overgrowth.png
Overgrowth
Exterior
Ditto


.png)
_bright.png)
.png)
_bright.png)


</tabber>
 Related achievements[edit | edit source]
|
Trespassing
|
References[edit | edit source]
{{#vardefine:columns|1}}
- ↑ LSPLASH (2024-12-21), "tried to fix room 150 cutscene overall" retrieved 2025-02-15
- ↑ LSPLASH (2024-12-21), "instead of staying at 97%" retrieved 2025-02-15
- ↑ https://www.youtube.com/watch?v=vtXvXtCEIdM
- ↑ https://www.youtube.com/shorts/tEid25_0lM0